
Boldmere
Golf Club
Home Members Prices &
Directions The Course News &
Events
Contact Us Slope
Table Safe
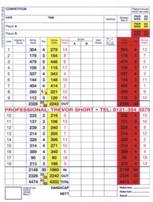
Golf Trophy Winners
Holes at Boldmere
Golf Club
Outward
Hole 1
Hole 1 is a 304 white yard par 4. A golfer who can drive the ball straight
should have no prblem with a par on this hole as a
straight drive will reward a comfortable second shot to green guarded by a bunker
on each side. However most drives left will end up in trouble in the trees or
out of bounds. A good steady opener for the course with straight drives being
rewarded, with a wide accomodating fairway. Please Click here for a picture from
hole 1.
Hole 2
Hole 2 is a 178 white yard par 3. The right club is
needed on this hole as a shot which is short has a good chance of finding the
two fairway bunkers that protect the green. A straight iron should reach the
green, but slightly left or right will leave you trying to avoid the three
bunkers that protect the green. Please click here
for a picture from hole 2.
Hole 3
Hole 3 is a 89 white yard par 3. It is the shortest
hole on the course. The hole is a straight hole with wooded areas hugging both
sides of the fairway and bunkers on both sides of the green. With out of bounds to the left of the
tee adds to the importance of a accurate tee
shot. Please click here
Hole 4
Hole 4 is 479 white yard par 5. It is the longest hole on the course and the
only par 5. The hole has slight dog-leg to the left from the tee with a wooded
area hugging both sides of the fairway, which makes a fairway drive essential
if par is to be made. Once the fairway has been found and the dog-leg has been
accomplished most players find a longish straight shot to the green. The green
has two bunkers on either side making sure an accurate approach shot is needed
to gain par. Please click here for a picture from hole 4.
Hole 5
Hole 5 is a 108 white yard short par 3. The fourth
hole is the second shortest hole on the course, and as most par 3's relies heavlily on the the tee shot. The
green should be found with a high iron shot due to the size of the green. It is
stroke index 17 so should be a nice par for the majority of golfers who can
find the green from the tee shot. Please click here for
a picture from hole 5.
Hole 6
Hole 6 is a 337 white yard par 4. The fifth hole is
only 337 in actual yardage but in real terms plays longer than its yardage due
to the uphill slope which faces you on your second shot. On the fifth finding
the fairway is essential so that the tricky uphill second shot is made easier, as
a good shot is needed to find and hold the green which sits on top of the hill.
The green is protected by four bunkers, two on each side, to make the second
shot even more challenging. A par feels very rewarding on this tricky par 4.
Please click here for a picture from hole 6.
Hole 7
Hole 7 is a 144 white yard par 3. Having climbed the
hill on the fifth hole the sixth is a challenging par 3 with the tee shot from
the top of the hill. The green is raised with a bunker on both sides. If the
green isnt found the ball with roll down off leaving
a tricky chip shot back up on to the green, putting extra pressure on the tee
shot to find the green in order to make a par. Please click here
for a picture from hole 7.
Hole 8
Hole 8 is a 404 white yard par 4. The seventh is
stroke index 2 so is graded as the second hardest hole on the course. The tee
shot is blind with a short carry to find the fairway. The seventh hole will
punish any shot that drifts left from the tree as out of bounds is close to the
left edge of the fairway. Once the fairway is found the second shot is slightly
downhill to a green protected by bunkers on both sides and a water hazard to
the left of the green. Please click here for a picture
from hole 8.
Hole 9
Hole 9 is a 260 white yard par 4, 221 yellow yard par 3. The tee shot needs to
miss the stream the runs through the center and to
the right of the fairway. A large welcomming fairway
should be found from the tee. Played from the yellow yards it is a tough hole
with most medium golfers needing a wood to reach the green, with any shot
drifting right finding water, making a par a good score to achieve. Please
click here for a picture from hole
9.
Inward
Hole 10
Hole 10 is a 112 white yard par 3. The tee shot has to carry the stream which
crosses through the center of the fairway to leave a
nice second shot. There is heavy wooded area along side the left side of the
fairway, however though the green should be found from the tee with a straight
iron shot, but trying to aim to the left side of the green is dangerous with a
slope off the left side of the green leaving a tricky up and down chip shot
from the rough. Please click here for a picture from hole 10.
Hole 11 is a 232 white yard par 3. The second hole of the inward 9 is a
challenging par 3 being rewarded with a long straight tee shot to the green which
is protected by two bunkers on either side needing a precise shot to guide the
ball between the bunkers and nestle on the green. So a relatively long par 3
that requires accuracy from the tee and for most average golfers another wood
from the tee making finding the green and holding it with a wood a very good
shot. Leading to par being a good score for the average
golfer, with finding the green from the tee with a wood a pleasent
bonus. Please click here for a picture from hole 11.
Hole 12 is a 131 white yard par 3. This hole is the start of three holes
out in the woods. The eleventh is a simple uphill par 3,
however though the green needs reaching with the first shot as if the ball
falls short it rolls a long way back due to the slope of the hill. The green platows rewarding shots the hit the green by staying on the
green for a nice putt. A hooked tee shot will either be in deep rough or out of
bounds on the left hand side. Please click here for a
picture from hole 12.
Hole 13
Hole 13 is a 239 white yard par 3. It is the hardest
hole on the course and there isnt a golfer who doesnt find this hole tricky. The blind tee shot needs an
accurate shot to find the green with a hard left to right sloping fairway. A
wood is also taken by most medium skilled golfers with the hole being 239
yards. If you are looking to lay up for a chip on to
the green the left side of the fairway needs to be aimed for due to the slope
of the fairway. Once at the large green, walking away with par will feel
rewarding. Pleas click here for a picture from hole
13.
Hole 14
Hole 14 is a 214 white yard par 3. Coming back on
yourself from the previous hole means that the fairway
has a right to left slop meaning a golfer who wants to lay up has to aim to the
right of the fairway to allow for the slope. This is a tricky shot due to the
edge of the trees being close to the best position for the second shot. The
longer hitters who are looking to find the green from the tee will still be
looking at using a wood which makes it all the harder to stop the ball on the
green, so another tricky par 3. Please click here for
a picture from hole 14.
Hole 15 is 326 white yard par 4. This hole starts a trio of par 4's
after returning from the woods for the 11th, 12th and 13th. A fairly straight
forward par 4 with the main problem being the stream that runs accross the fairway which leads the dilema
of driving just past the stream or taking an iron short of the stream. Once the
fairway is found a relativley easy second shot is
forthcoming with the main problem coming with rainfall as the ground becomes
very soft underfoot. Please click here for a picture
from hole 15.
Hole 16 is a 314 white yard par 4. The key from the hole is the tee
shot, with a tricky tee position. A good tee shot will lead to a comfortable
second shot, while a not so good shot could see the ball drifting the rough and
trees on the right hand side of the fairway. The approach shot to the green
needs to miss the two bunkers either side protecting the green. So a relatively short par 4 where par is very makeable.
Please click here for a picture from hole hole 16.
Hole 17
Hole 17 is a 389 white yard par 4. This is the last
par four on the course and is the last chance to hit the driver. All along the
left of this hole is the La Reserve lake, which
means that any shot that is hooked can find itself in the water, there is also
a wooded area on the right hand side. Once on the fairway the second shot is
slightly up hill to the green. There is a bunker on the front left of the green
that needs to be overcome to find the green. Please click here
for a picture from hole 17.
Hole 18
Hole 18 is a 147 white yard par 3. The final hole on
the course plays with the La Reserve lake
running along the left hand side of the fairway, so a tee shot that draws is
likely to find the water. There is a right to left slope which leads any short
ball into the bunker that guards the green. tricky
hole to par, but a good end to the course, that even with a low par can still
be a challenging course, as is shown with still the lowest recorded score only
being five under par, after many years of people trying! Please click here for a picture from hole 18.
Back to top